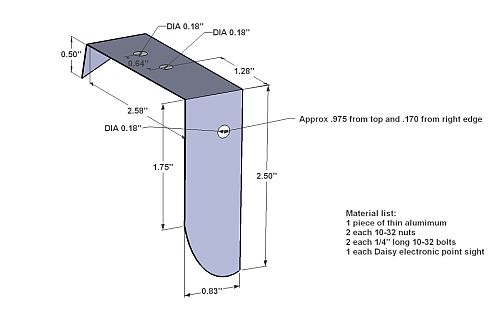

Iso view
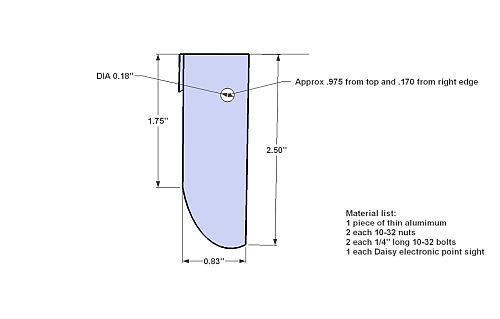
Front view
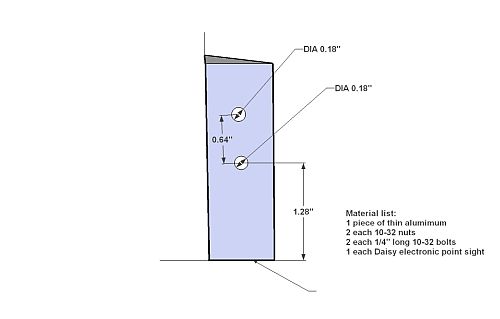
Side view
Top view
Astronomy for a Beginner, from a Beginner...
In the Beginning......
I bought a cheap telescope for my wife. You know the kind that K-mart and Walmart has on display before Christmas. The pictures on the box looked great! I thought this would be good to look at the stars and planets and maybe we can see other worlds! Well you know the story. Disappointment. Yes we could see the moon as long as you kept turning the damn thing or lined up where you thought it would pass and just watch it move by. Well we used it a few times and then it sat in the closet. That was back about 6 years ago. I decided in 2005 to try to find something that might work better. I'm one of those typical men that just knows I can figure out which is best on my own. So I decided it would be much easier on everyone if the telescope would just find things on its own. So I saw a "Go To" telescope from Meade and ordered one. Now remember I'm on a budget so can't get crazy and beside my last adventure with a cheap telescope was a disaster. So I was trying to keep from spending to much and yet make it something we could use. I purchased the Meade ETX70AT which at that time came with the tripod for under $200.00 so I figured at least we might get some use out of it. The first night out I was able to look at the moon (shades of the 1st telescope). Couldn't get much of anything else as, well you know, it's so hard to read the instructions in the dark.....
I decided maybe I should read the book during the daylight and then try again. 2nd night out was better but still had problems. I didn't seem to want to find what I thought I was looking for. So back into the closet. It sat for a few months and I decided to drag it out and try again. Little better luck but still having problems with the "GO TO" it just didn't seem to want to work. I could find things but always had to work harder at it than I thought I should have to.
We had a chance to go up to Palomar and see a "real" telescope. And that gave me the incentive to try again. Well thanks to the internet, I was able to find enough information to determine some of my errors. (Thanks Mike! Weasners Mighty ETX site.) After working with the changes I decided to purchase a Meade LPI (camera) to try to take some pictures of the moon (hummm still working with the moon shots). I found Saturn and was able to get some 'fuzzy' pictures of it. Back to the internet again to find out what I could. There is a wealth of information about all kinds of different telescopes and how to use them but way over my head technically.
So here we are today. I have done enough research and read enough information to make my self dangerous. I'm one of those who has enough knowledge to keep myself out of trouble most of the time but not to afraid to try something to see if it works. I decided to put this web page together to share some of my thoughts and ideas and hopefully keep some others from falling into the same pitfalls as I did.
The one thing I have learned from all of this is patients.... lots and lots of patients....... Sometimes the "light bulb" goes off and you look back and say "how could I not have figured that out?"
Until such time as I'm rich.... (ha ha), I will keep plugging along with my little ETX70. It's small, easy to move around and, for one who can't see much without glasses, works okay for the time being. I have had the opportunity to look through some bigger telescopes and for the price difference, well so far I am going to stick with what I have. I have come up with some cheap and easy fixes that help it along and will share them on this web site. Again I hope this will help some others.
Since I live in southern California (really bad light pollution) I have had the opportunity to visit OPT (Oceanside Photo and Telescope) during one of their big get together's (SCAE event). I learned much during the 2 days we went. More than I could use but some valuable information from Mike Weasner's seminar on the ETX and what you can expect to see. Fortunately with the first telescope my expectations from what the pictures showed on the box had changed, and I had a much better idea what reality is. So the information Mike passed on was in line with what I already knew but he also gave me some ideas on improvements. I have referred to Mikes web site earlier and would highly recommend spending time looking for information there. He has been at this for a long time.
Now for my lessons learned:
1. Read the book! Do this in daylight sitting in a chair. Not outside at night with the telescope. It will eliminate much of your frustrations......
2. North is not North! Or what most people would think is north. The compass points to "Magnetic North". This is NOT north for telescope setup purposes. This is the reason that for almost a year I couldn't get the "GO TO " to go to anything without having to mess with it over and over. The Meade manual that you have already read doesn't really make this clear. (so much for reading the book). Where I live (in southern California) true north is 12 degrees different that magnetic north. (big difference!) and that changes depending on where you live. So I'm adding a link that will help you to determine "True North" from "Magnetic North" for where you live. What I have also done is locate the star Polaris to help determine true north. Reading star maps is another whole story I will get into later but if you can locate Polaris in the night sky it will give you a reference. I normally set my telescope up in the same exact location every time so I have a point on my shed (about 30 feet away) that I can point the scope at when setting it up that is "True North". This makes life much easier. If you use a compass (yes you can). Just remember to adjust for the difference when you set up the scope.
3. Power. The ETX come with a battery pack that powers everything. Well you know how it is you get the scope set up. (1st times are 20 to 30 min's). Slew to the 2 stars (messing with the scope to find them) and finally your ready to look at something. Humm scope seems to be acting up.... Then you realize the battery's are to low. So you have to stop and change them. Then you get to do all of the above again! Not sure about you but this had happened to me a couple times when I had my family and grand kids standing there going "Grampa when I can look?" Soooo. I decided I needed to fix this problem. Having some background in electronics (30 plus years) I looked at the power supply Meade sells and determined it was really a "12 volt" adapter. Funny if you used 6 each AA batteries at 1.5 volts it only adds up to 9 volts. Humm more isn't always better, and those wall plug power supplies are always "over". So back to the internet. Some people have had problems using even the Meade supplies so "be careful" if you are the least bit reluctant and afraid you might damage your telescope don't use a power supply! You can either continue with the battery's or you can purchase a "power tank". These are basically the automotive power jumper packs you buy from Pepboys. They are still 12 volt but are closer to the true voltage.
Me being a little more daring, found a plug in the wall type I had just laying around that was rated at 12 volts 1500 ma and I modified the power plug to the "9 volt" clip type so it would just plug into the scope where the original battery pack plugged in. Now to give all of you the warning! Do NOT get the polarity wrong. This is one of those check it once, then check it again and just to make sure check it a third time. This is not a "forgiving" thing. If you mess it up it is all over with. Easy way to check it is to load up the original battery back that came with the telescope with batteries. Check the battery pack polarity with a voltmeter. Then check your power supply with the voltmeter. They should be the same. I won't get into the details here because if you don't know what I'm talking about now I wouldn't trust that you could get it right with more detail. If you are afraid of this don't do it. Either buy the one Meade sells, or get the power tank. If you purchase one outright that is recommended for your scope the chances are it will not ruin it.
4. Taking Pictures.
Keep in mind the ETX70AT telescope is not Hubble...... You aren't going to get those great nebula and galaxy shots you see on the internet. The idea here is to take some photos that you can say "hey I took that". The Meade LPI is what is says it is a "Lunar, Planetary, Imager". You can take photos of the moon, and some of the planets. You are working with two distinct disadvantages here. One the LPI is the least expensive camera you can purchase (basically a web cam), and two, you have a small telescope. This is one of those things that all I can say is don't expect to much. Just as with the telescope, the LPI comes with a manual. Go find the chair, sit down and read it. It won't make much sense but you need to get familiar with the terms and were the "check boxes" are on the screen. Just as a note since I didn't mention this before, you need a computer to use the LPI. Hummm hope I didn't get one of these "nobody told me that" replies. Suggestion would be a Laptop would be easier to haul outside instead of the good ol' desktop your reading this from. As is normal, bigger is better. The software, controlling the scope and the LPI will all slow things down on the laptop so you will want to make sure you have something that can handle it. (If your laptop is more than 3 years old you might want to hold off on buying the LPI until you get something a little more powerful). Also remember if you want to control the telescope with the computer you will need to order the cables. Don't try to make them. Order them.
There are a number of other ways to do "Astrophotograpy" but remember I'm keeping this on the cheap. The LPI is a "plug and play" and is made for the Meade scopes so it keeps things simple. I don't own a SLR camera so haven't the experience to help you there. If your willing to experiment there are ways to do it.
5. Software
The Meade ETX70AT came with the Autostar Suite, which is the Meade basic software. The LPI also came with another version of the Autostar Suite so now I had 2 discs, I also purchased a MySky (another whole story) that came with a version of the Autostar Suite (yes that's 3 now). So here I am with all of these CD's and really didn't know which one was which. I went to the Meade web site and found under there "customer service" section that you could download the latest version of the Autostar Suite. So I trashed the CD's and went with that. During my internet travels I found a link to a guy in France that has written a program called WinStars. And it was free. (remember I'm cheap!) So I downloaded a copy of it. Wow! for those of us who keep pounding away on a Windows based operating system, this is the best! I even went so far as to sent him the $9.00 for the high resolution license (what a deal!). It will guide your telescope (with the correct Meade cables) and lets you use the Envisionage portion of Autostar for the LPI at the same time so you can take pictures. I have found that WinStars is much more "visual" than the Autostar Suite and you can't beat the price!
6. The Meade MySky
I bought this to keep the wife and grand kids busy while I was setting up the telescope. Turned out to be a good investment. I have read where a lot of people who bought these have had nothing but trouble. Funny thing is I haven't had any problems at all. I purchased one of the "early" ones (just after the 1st price drop). I haven't done the software "update" that Meade offers as I'm just a little reluctant to put the sd card into the reader and have it clean it during the process BEFORE it loads the revised software up. I even went so far as to create a new sd card with the old software on it and attempted to put the update on it. I haven't had any luck with that process and am still not willing to use the sd card that came with the unit to do the update. My plan is to convince someone and Meade to "exchange" the sd card. I can't see "fixing" something that ain 't broke and I've heard to many horror stories.
I will say that the MySky has worked great and really keeps the wife and grand kids busy which was the intent.
7. Home built Add-ons
The cheapy way to do a finder scope for an ETX70AT.
Remember your days as a kid, when you got that Daisy "Red Rider" BB gun? (Ya I know it's a movie!) Well Daisy has gotten techy.... They have "red dot" view finder (model 7809) and guess what! It's cheap! Load up the station wagon and head off to Walmart. They cost about $12.00. Now comes the problem. How do I stick this thing on my telescope. Well back to Weasners web site for some help. One guy suggested "double sided tape" (hummm maybe duck tape?) another suggested velcro (I tried that one) and yet another the white ty-raps, however the sight keeps getting loose and I had to re-align it every time I used it. Meade sells a bracket for the finder scope they sell, but remember I'm cheap. So out to the junk box I go. I find a piece of thin aluminum (from my old race car days) that I figure I can cut and bend to make it work but I'm not really keen on drilling holes in my telescope. Then I remember the Meade bracket. They use one of the screws that is already on the scope. This is going to get really hard to verbally explain so, since a picture is worth a thousand words I'll save some typing.
Here's 4 drawing views for the bracket I made. If you click on the image it will get bigger and you can print it.
|
|
|
|
Iso view |
Front view |
Side view |
Top view |
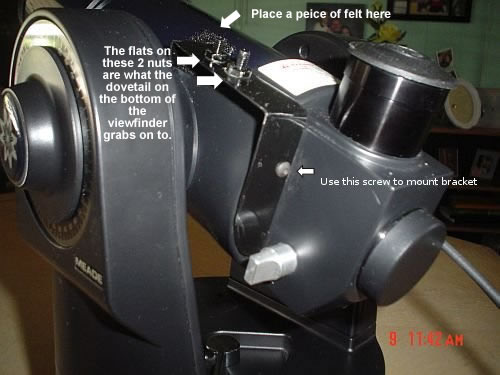
Here's some photos of the finished product. (Click on the image for a larger view and more details)
 |
 |
The dimensions in these drawings are not that critical. With the exception of the hole for mounting it to the telescope. That one needs to be pretty close so the edge will fit tight against the bracket. Otherwise you have about a 1/16 or so of slop. The little angle bend at the front of the mount (seen best in the side view) is not that critical either. You can use that as a minor adjustment to make sure you get the mount parallel with the telescope. The Daisy sight has adjustments for left and right and up and down so you have some room to be off and everything will still work okay. Have fun!
If you have questions you can email me at ghswen@webewebbiers.com
The cheapy way to do a focus aid.
The ETX70 with a 3 times barlow can get kind of hard to focus. Made even more difficult if you are trying to focus it using the LPI imager on your Laptops computer screen. The "preview" will jump all over the place every time you even touch the focus knob. (more about focus knobs later). After reading more stuff on the internet I found you can use a "focus aid" that is basically a cover for the big end of the telescope that has 2 or 3 holes in it. The concept is that if you point your telescope towards a bright star with the cover on the end of it you will see an image through the lens of 2 or 3 points of light (depending on how many holes are in the cover). If you attempt to focus you will see these begin to come together and once the image becomes one you are now in focus. Hummmm. guess I need to see for myself. I did some looking around and found some on the internet but really wasn't comfortable purchasing one just to see if it worked. So back to Mikes site again!. Found a few different options all of which looked like they might work. From foam pads to card board cutouts. So I did a quick walk around the kitchen while my wife was a work and inside the fridge I found a soft butter container that looked like it might fit the end of my ETX 70. So after eating my bread and butter sandwich (lot's of butter!) I cleaned out the dish and cut it down a bit and it fit!. Now to figure out where to cut the holes. Some where I read to try to keep the holes as far out to the edge of the lens as possible to I measured a circle, split it up into 3 sections and found a 3/8" flat boring wood bit. Since the butter dish wasn't very thick I wasn't comfortable using a drill to do this so I just turned the bit using my hand and pushing it through. (don't cut yourself!). This worked fine. To test it out I waited until dark and put it over the end of the scope and sure enough I could see 3 stars where there should be one. I turned the focus knob and they started to move together. It takes some practice but it really seems to work. Next step was to paint is black. If for no other reason than it just looks better. Here's a picture of the end result. Total cost? A tummy ache from the sandwich. (wife still can't figure out what happened to that butter she just bought.)
Here's a photo of the finished product. (click on image for a larger view)

Focus Knob.
Well sometimes you have to spend some money.....
One of the big problems with the ETX70AT is trying to focus it. Meade put the knob at the end of the telescope and I'm sure the guy that designed it must have been a midget. There is no way that you can get your hand in there to adjust it without moving the scope. Again back to the internet. I found a few people that had made their own "extended" focus knobs but I just could find anything in my junk box (or the "fridge") that looked like it would do the trick. So I splurged and bought the ScopeTronix Flexi-Focus $35.00 or so bucks plus shipping, but it works. There are some other less expensive versions out there but the quality of this one looked pretty good. (I haven't broken it yet!). This basically is a flexible cable that moves the knob out to where you can get your hand on it. The scope will still jump around when your trying to focus the LPI on the computer screen but hey you can't have everything.
Solar Filter
This is something you don't want to mess with.... No "mickey mouse" stuff here. You will see warnings about NEVER pointing a telescope at the sun with out having the correct filter. Don't mess around with trying to come up with something on your own. Buy one from a reputable dealer!
While I was looking at the ScopeTronix web site I decided to order a solar filter also. I haven't had much time to do "solar viewing" so can't really tell you much. There isn't much going on with the sun right now (solar spots and such) so all I have seen so far it a big yellow dot. Once the weather co-operates (cools down a bit) I plan on getting back out there and trying to use the LPI for some images. (I will post them once I have something worth looking at).
Lens filters
can't make these
I have purchased the basic Meade filter pack (4 different color filters). They seem to bring more detail out when viewing the moon or the Jupiter. (this is what they are advertised to do) However you have to get past the "color" difference. When you are using the "blue" filter, guess what, everything turns blue.... You can see more detail of Jupiter's bands but you just have to get past the color difference.
I also purchased the Celestron UHC/LPR filter since the area I live in has way more light pollution than we need. It seems to help, however remember when you use a filter of any kind it is going to cut down on some of the light from what you are viewing. If it isn't very bright to begin with the filter may just cause it to disappear.
3 times barlow
Can't make this either.
This was my attempt to make things appear bigger.
I works but keep in mind that with a small telescope you can't work miracles! I have found that it makes a significant difference in seeing Jupiter and Saturn. You can see much more detail as long as you are careful no to bump the telescope. When viewing galaxies or attempting to see nebula well it doesn't seem to help much as they are so large anyway you lose the field of vision. It is kind of one of the "experiment" things to see what works best for what you are attempting to see.
Parfocal
Oh ya.....
Meade was kind enough to ship 2 lenses with my ETX70AT. A 9 mm and a 25 mm. I purchased the 3 x barlow and the LPI and I'm still going crazy having to change focus back and forth every time I want to "bump it up a bit" by changing a lens or adding the barlow. I've read about using parfocal rings to correct for the different length of the lenses. I have one ring that came with the LPI camera and I have played with it. It works but I have another lens and the barlow to set up also so as of now I haven't wanted to spend the money for "just a ring with a screw in it." This will be one of my projects that I will be working on shortly. As I mentioned the changing of the focus knob is a real pain and that is what normally prompts a fix. I have read that someone has used PVC pipe to make the rings. Hummm... maybe. I will do an update when I figure something out.
Meade LPI
This is a small "web camera" that Meade sells as a planetary camera. I found out that it does well with the moon, Jupiter, Saturn and so far that is about it. Anything "deep sky" it just doesn't want to capture. The hardest part of using any type of capture accessory is focusing. Everyone keeps saying to have patients. So I guess I will. If you want to see some of my attempts you can visit my blog by clicking here. (note you will need to go to the "archive" starting Feb 2009 and eariler to see the ETX images.)
Update: (11-11-08)
Celestron Zoom Lens
Couple updates. Got tired of changing lenses all the time (and re-focusing). So I bought a Celestron Zoom Lens. ( 8 - 24mm 1.25" Zoom Eyepiece [CE-93230] ). Very happy with it. If I attempt to zoom to 8 mm I get some distortion however by just backing off a bit it goes away. Very little re-focus required and it works with the 3 x barlow!. I now "parfocaled" my 25 mm meade lens to my newest toy! (see below).
Meade DSI II -C
I tried to "e-Bay" for a used DSI (deep sky imager) but couldn't get it for what I wanted to pay for a used piece of equipment. So I went ahead and splurged and bought a new DSI II-color. This isn't the latest version but should work well with my little telescope. 1st light (1st time out) went well. I had spent quite a bit of time reading on the internet and the manual that was included with the disc. Most all said to try setting the 1st exposures to about 5 seconds and take 50 photos to stack. I did that but was attempting to capture the Andromeda Galaxy. Found out later that I should have been at about 30 seconds for exposure. Not sure this will work however because I'm still using "Alt / Azimuth" setup. I figure I will try about 30 seconds next time I get some clear sky. In the mean time here's my 1st attempt.

July 2009
Quick update: I have purchased a new Sky-Watcher 254N with EQ5 pro mount. (no I'm not rich yet!)
Plan is to keep the ETX70 as my "grab and go" since the Sky-Watcher setup is much larger and heavier (it's my "grab and lug" setup).